• User avatar
  • User avatar
  • User avatar
  • User avatar
  • User avatar
User avatar
By JF TüR
#17562
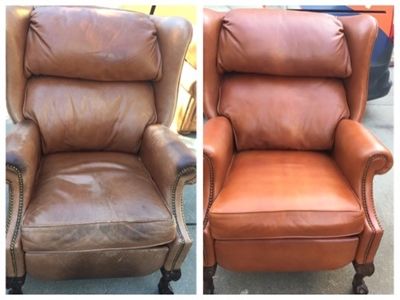
So next I'll have to attack the top part. I have 2 worries with the upper part... One is with the foam bolster that needs surgery but I'll tackle this later. The immediate worry is with the stitching. There is 2 French stitches that meet in the corner and will need a top stitching on top of that. That's a lot of folds... I'll trim the allowance but there's also a ruban underneath so the stitch dont rip open plus a 1/4" scrim. I practiced on thinner leather with the ruban but no scrim and I felt like my machine was maxed out... Thinking of smashing the area with a hammer. Any suggestions??
Attachments
20240521_155623.jpg
20240521_155623.jpg (818.21 KiB) Viewed 5293 times
Last edited by JF TüR on Wed May 22, 2024 3:22 am, edited 1 time in total.
User avatar
By JimmieJoe
#17563
Looking at the photo, I believe the French seam was done before the 2 panels were sewn together to make the 3D corner.

John has a video where he was showing me how to do a similar feature on a shift boot/gator.
User avatar
By fibersport
#17564
Fantastic job. Can you share any foam repair site or videos? I have to repair some foam on a Jeep seat and am a little unsure hoe to begin.
User avatar
By JF TüR
#17565
JimmieJoe wrote: Wed May 22, 2024 2:30 am Looking at the photo, I believe the French seam was done before the 2 panels were sewn together to make the 3D corner.

John has a video where he was showing me how to do a similar feature on a shift boot/gator.
That's correct, this is my test run and I did both French seams and then joined the 2 together. It's the top stitching all around that I felt like my machine was maxed out... The leather I used is thinner than my upholstery leather and I didn't used scrim foam either on the test. So I'm a little uneasy about doing the real thing now...
Last edited by JF TüR on Wed May 22, 2024 3:25 am, edited 1 time in total.
User avatar
By JF TüR
#17566
fibersport wrote: Wed May 22, 2024 3:02 am Fantastic job. Can you share any foam repair site or videos? I have to repair some foam on a Jeep seat and am a little unsure hoe to begin.
Thanks!
I liked that one, he's a bit... But his technic is simple and effective


This guy too

And I've learned TONS, like almost everything from a guy on YouTube named Cechaflo. He has videos on EVERYTHING.
User avatar
By fibersport
#17567
Thanks for the foam repair video links, will watch later today. Regarding your seam, thaat is a lot of layers. Be careful that your stitch length doesn't change. I was practicing on various seams one time and as it got thicker, my machine struggled through it but ended up shortening the stitch. You mentioned Cechaflo, wish he would talk! All kidding aside, he had a video where he was sewing up multiple layers or something like that, he trimmed some material out to make things lay better - maybe that might help.
User avatar
By JF TüR
#17568
fibersport wrote: Wed May 22, 2024 11:11 am Thanks for the foam repair video links, will watch later today. Regarding your seam, thaat is a lot of layers. Be careful that your stitch length doesn't change. I was practicing on various seams one time and as it got thicker, my machine struggled through it but ended up shortening the stitch. You mentioned Cechaflo, wish he would talk! All kidding aside, he had a video where he was sewing up multiple layers or something like that, he trimmed some material out to make things lay better - maybe that might help.
Yeah, I think I'll have to do another test run with the actual materials so I know if it's doable or not. It's a focal point, I don't want to mess it up. I think I know all the technical stuff to do this but I also think that my machine reached its max. It's not a heavy duty shoe maker machine...

Cechaflo, that doesn't bother me as I am a watch and learn type of guy. I just need to see it to understand. Not so good by just reading lol. Anyways, I'm sure if you pay to get his courses you'll get the talking. Otherwise he would give away all of it for free on YouTube...
User avatar
By LLeeT
#17569
I like it allot. My upholstery shop carries the J strip. I thought most of them would. It is not quite the same, just a bit narrower than what was on my job.
User avatar
By WILD BILL
#17570
For that seam I would try and cut away as much of the foam in the seam allowance as possible and see if you can't get the results your after.
User avatar
By JF TüR
#17572
LLeeT wrote: Wed May 22, 2024 7:13 pm I like it allot. My upholstery shop carries the J strip. I thought most of them would. It is not quite the same, just a bit narrower than what was on my job.
Thank you very much! I Know it's a different style than we usually see but it suits well the style of car it's going into.

And thanks for bringing the J trim subject, I'm in Canada in a remote location and I don't have access to an upholstery shop. I did find some online that I ordered. But they're rubber and rolled and it totally kept the memory, I can't use it! The originals are ridgid plastic. There's some "arrow" trims I think it's called that I'm gonna need too and I can't find these anywhere either...
User avatar
By JF TüR
#17573
WILD BILL wrote: Wed May 22, 2024 10:52 pm For that seam I would try and cut away as much of the foam in the seam allowance as possible and see if you can't get the results your after.
I agree with you 100%.every little things will help. When I sewed the scrim, I was like a 1/16" off my seam allowance. I'll do that again. And where the French seams are folded, I removed everything that was folded in the allowance.

I think I'll have to do a test run with the proper materials. I'll keep you guys posted next weekend. Cheers!
User avatar
By JF TüR
#17580
missgee wrote: Thu May 23, 2024 2:03 pm nice job..
those look like corvette seats
Thank you! It's been a fun project.

They are Recaro seats from 1994. They were installed as an option mostly in Europe on VW Corrado. Extremely rare to find, they have an uncommon bolster shape to them.
User avatar
By JF TüR
#17590
Alright I'll share what I've done to overcome that thick stitching in case one of you is interested. Please don't judge the quality of the stitching, these are quick tests... So first I upped from #22 needle to #23,it doesn't seem huge but the #23 is actually quite larger than the #22. I'm using Serabond 135 btw. When I'll do this for real I'll be gluing my leather seams and will also cut back the scrim in the seam allowance.

Basically, I trimmed the leather in the seam allowance leaving only 1/8". Then I top stitched the French seams with the ribben. After I sewed both French seams together, I narrowed one side by half. Then, I hammered the thick part where they meet and it took a lot of height down actually. The top went through like no problem at all.

Problem fixed, hopefully I get some time this weekend to work on the bolsters!
Attachments
20240524_164126.jpg
20240524_164126.jpg (1.5 MiB) Viewed 5118 times
20240524_164549.jpg
20240524_164549.jpg (1.36 MiB) Viewed 5118 times
20240524_165031.jpg
20240524_165031.jpg (1.83 MiB) Viewed 5118 times
The clear plastic that goes over leds

Hey guys im new to working with Led lights, im won[…]

Lawnmower grass catcher

I looked at the 420D and also 600D but, as far as […]

New guy

Perhaps a larger needle? Could be getting deflecte[…]

First Auto Upholstery Project

Thanks, everyone! Yes, that's Morbern Carrara in […]